Showing posts with label Envelope Punch Board. Show all posts

Tuesday, March 10, 2015

Envelope Punch Board Fun!

Good Morning Happy Stampers!!

If you are anywhere in the Midwest like me, these last few days have been AWESOME!!  
Spring has sprung and there has been no other way to express our joy than by stamping!!

Have you heard of the Envelope Punch Board?!  


Create your own envelopes from any cardstock or Designer Series Paper in up to 66 different sizes in three easy steps:

Step 1. Score and notch your envelope using the built-in notch punch;
Step 2. Round the flap using the built-in corner rounder punch;
Step 3. Fold and adhere the envelope edges.


The Envelope Punch Board includes an easy-to-use sizing chart (measurements provided in inches and centimeters) and a scoring tool that tucks away in a convenient storage slot.


Yes!!  This amazing piece of equipment can do SO MUCH!!
You can create just about ANY sized envelope ...

Wanna make a cute 3 x 3 card and don't have any extra envelopes laying around?   Just follow the simple guides printed on the board and VOILA! you have a perfectly matching envelope.

But it's not just for envelopes.....
Can you just imagine the possibilities?
Corner Rounder...
Perfect score line placement...
In-line notch maker...

EEK!!
Wanna see what our designers used their Envelope Punch Boards for?

Have a card or a project of your own?  Feel free to share with us on Facebook!  We have a group for great sharing and some Inkspiration!

Be sure to leave them some love!  Each designer has added instructions to their projects on their blog.  Love them!


Jennifer Gregorsky - Jenny G Paper Crafts


Darcy Johnson ~ Dj's Stampin' Place
(Photo/Written Tutorial for the jar included)

Thanks for stopping by today for your daily SSInkspiration! Don't forget to check out our Facebook and Pinterest pages for even MORE Inkspiration!

Tuesday, December 16, 2014

Stampin' with Cynthia!

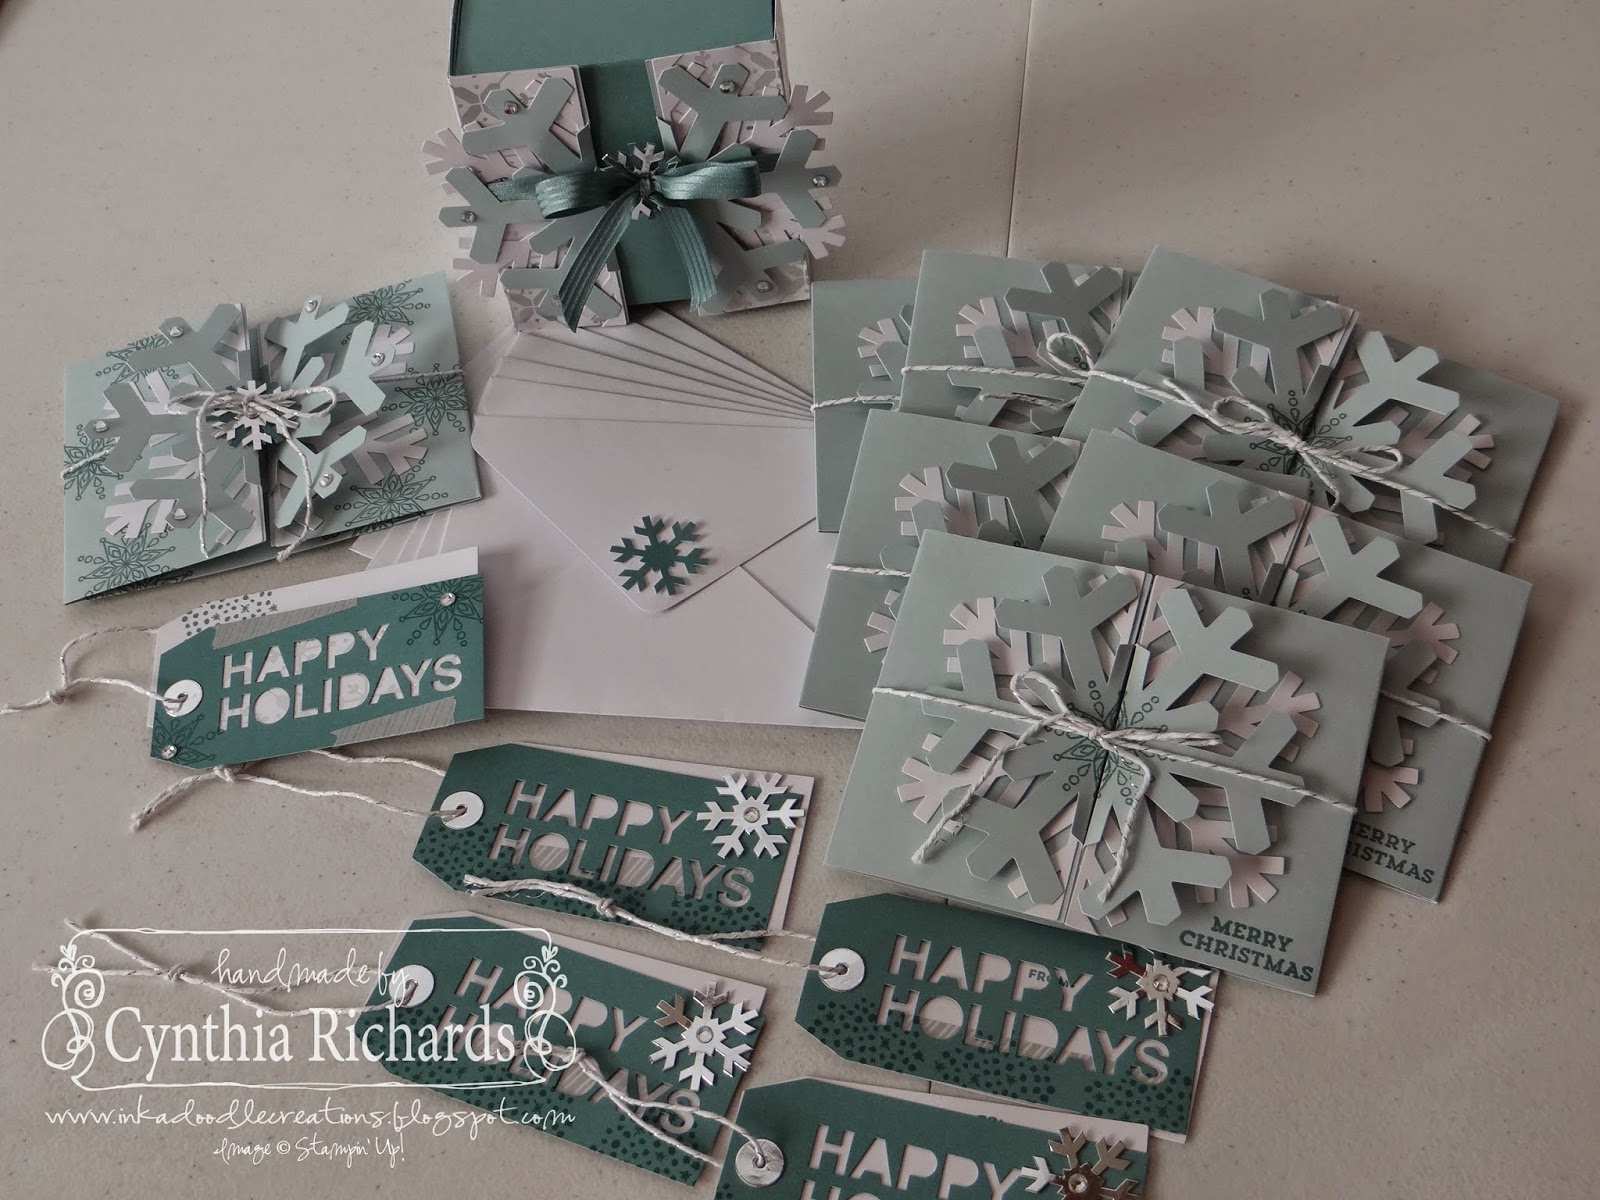
Good morning, Cynthia here with Ink a Doodle Creations.  Today for my individual post project share, I wanted to create and share the items that I made with the November My Paper Pumpkin kit.  I needed some quick and easy Christmas cards to give to each of my neighbors with their cookie treats.  I love how Paper Pumpkin is always there for me when I need these simple and quick projects.  I also love it when all of this....


....can turn into all this and much more!


I needed to create some quick and easy Christmas cards to hand out to my neighbors. I used all the supplies included in the kit to create the projects just like they are shown in the instruction papers included in the kit.  BUT, yes like everyone else, I enjoy editing it a little to make it my own as well as using the left over parts (cause Stampin' Up! does a wonderful job at giving you plenty and lots of extras) to create something new.  (stay tuned for next weeks scrapbook page!!)


So for the most part, my card is created the same as the others.  I just stamped with the snowflakes, added some rhinestones to the tips of the large snowflake and added the die cut lost lagoon and silver foiled snowflakes to the center.


I also created a different stamped tag.  I added a piece of DSP behind the "happy holidays" cause it matches.....


...this cute little box wrap.  This is the project that I will be sharing the instructions for, so that you can recreate it on your own.  I created box #12 (as I have numbered them from the 1st size down to the last size, to know which one I need for future use) for the wrap to go around.  It was the closest box in size that can be made with the Box Punch Board.  The box slides easily in and out without having to untie the bow and messing it all up!!!


To cover up the added score lines, I covered it with a piece of DSP from the All Is Calm pack.  I also used about a 24" piece of lost lagoon satin ribbon to wrap around instead of the twine, as I wanted it to be a little more sturdy.


If you look closely, I used the beginning score lines of the card to start getting the score lines I needed to wrap the box.  I didn't want to make anymore new lines than was needed.  The two together help show where I began.  You will use the two provided score lines on the card to work off of to get your others.


So if you start from the first score line (the one that is already on the card) you measure in towards the center 3/4".  Do this on the other side as well.  Adding these two score lines gives you the bottom section for the box to sit on as in the picture below.  The box fits perfect now in between.


Now start from that newly created scoreline and measure back 1-15/16" towards the snowflake end on each side.  Doing this give you the lines you need to have it wrap over the sides of the box and top as shown in the next picture. 


Remember, you will not use the starting score line that comes on the card already.  It will get covered by the DSP and you won't be able to see them from the outside.

I hope you have enjoyed my snowflake projects.  Leave some "love" and if you have any questions, leave a comment and ask away.  I'll be glad to help you recreate it for yourself!

Supplies Used
November My Paper Pumpkin Kit
lost lagoon satin ribbon, box punch board, all is calm DSP pack

Thanks for stopping by today for your daily SSInkspiration! Don't forget to check out our Facebook and Pinterest pages for even MORE Inkspiration!

Tuesday, July 29, 2014

Festive Flurry Note Card Holder with Tutorial

Good morning stampers, Cynthia here with Ink a Doodle Creations.  I am so excited to be sharing my project with you today.  If you remember from our Christmas in July post last week, I made a cute little note card holder that was decorated with the Joyful Christmas stamp set.  I had colored it with our new Stampin' Up! Blendabilities.  If not, click the link above and you can go check it out.  Well like I promised, I have the quick tutorial on how I made the little note card box and pictures of the 2nd design, which I promised also!!  No sneak peek either, you have to wait til the end for the finished project!!


Step 1:  cut your choice in colored cardstock to a 6-1/2" x 6-1/2" piece.  I will explain why that size in the next step. 


I wanted my box to fit my note card size of 3-1/2" x 5", but wanted the box to be a little shorter so the note cards could be seen from the outside.  I went with a 3-1/2" square size to start with.  Now when wanting to make a box to hold cards and envelopes, think about how thick you need it then add that onto your cutting and scoring measurements.  My thickness is only a 1/2", so I cut my cardstock to 6-1/2" square. 

 Step 2:  So the envelope punch board says your first score/punch measurement is 3", and that is just what you will do.  Punch and score at the 3" line.

now you are going to once again add that 1/2" measurement and slide your cardstock to the 3-1/2" line, punch and score.
 Step 3:  Now turn your cardstock to the next side and using the score line guide, line it up with the first line, punch and score.  Then slide it over to the second line, punch and score again.  Continue this same step for the other two sides.  Now you won't be folding all four sides of the box, so if you are funny about having scored lines when you don't need them, you can skip this step on one side.  It doesn't matter which, cause the box is square.
 Step 4:  Now the Envelope Punch Board has a built in handy dandy corner rounder.  You can now round each corner if you would like.
Step 5:    Fold on all the scored lines except for the one side that is gonna be your top of the box.  Now I would normally use redline tape on boxes, but now since we have the Fast Fuse adhesive (its the bomb!)  its not as easy to show you where I put the adhesive at, but you can kinda see the shimmer off the right hand side flap of the box.  If you can't, I have the bone folder and scissor tips pointing to the two flaps where you need adhesive.

Step 6:  Depending if you are a righty or a lefty, doesn't matter which (even though its been proven that lefties are the only ones in their right minds - can you guess which one I am!?!)  Fold in the LEFT hand side first, then fold in the right!  LOL!
Now that all sides are glued and folded in, you can now decorate how ever you wish.  Now are you ready to see how I decorated this set???
So this is my 2nd finished note card set all ready to be given away to one of my youngest sons teachers for this year.  Never to early to start thinking of handmade Christmas/Holiday gifts.  I just love snowflakes and the Festival Flurry stamp set and its matching framelit set.  On this set, I also colored the snowflakes with the coastal cabana blendabilities.  The 2-1/2" x 11" whisper white belly band is embossed with the large polka dotted folder.  I then used my finger dauber to add some smoky  slate color to each circle.   My "thank you" sentiment comes from the Petite Pairs stamp set.  I wrapped and tied a simple bow around the box with the thick coastal cabana bakers twine.
 
On the inside of my box, I have four matching note cards, stamped with simple snowflakes.  There is also room for four envelopes.


I hope you have enjoyed my project and tutorial.  I hope you got INKspired to go create your own set!
 
Supplies Used
Cardstock ~ whisper white, smoky slate, coastal cabana, silver glimmer paper (retired)
Ink ~ momento ink, coastal cabana, smoky slate
Blendabilities ~ coastal cabana
Stamp set ~ festival flurry, petite pairs
Misc. ~ basic rhinestones, coastal cabana thick bakers twine, envelope punch board, polka dot embossing folder

Thanks for stopping by today for your daily SSInkspiration! Don't forget to check out our Facebook and Pinterest pages for even MORE Inkspiration!

Thursday, December 26, 2013

Envelope Punch Board Treat Box

Hi! Darcy here from Dj's Stampin' Place. Thanks for joining me today! I hope you've had a wonderful holiday season and survived the hustle and the bustle. I've got a little treat for you today, that will work perfectly for New Years! As a special gift, I've created a photo tutorial for you.


This sturdy box can be filled with treats and used as a hostess gift for a New Years party you're attending. Perhaps you're leaving the kids at home with a sitter. Fill it with popcorn, candy and other movie treats for their own celebration!

Let's get down to the nitty gritty! (Remember you can click on the pictures for a larger view)


I love that Stampin' Up Designer Series Paper is double-sided. It really adds to projects like this where you will see the inside and outside. This DSP is a sneak peek of the Kaleidoscope package available in the upcoming Occasions Catalog. The sales period for this catalog begins January 3rd. 


1) Line the paper up at 1-1/2". Punch and score.
2) Rotate paper 90 degrees.
3) Line up second side at 3". Punch and score.
4) Rotate paper 90 degrees.
5) Line up third side at 1-1/2". Punch and score.
6) Rotate paper 90 degrees.
7) Line up last side at 3". Punch and score. 
***Note*** Be careful as you are scoring. You want to just score to the edge of the board. If you move down the score line too quickly, you can slip off the corner of the board and rip your paper; as you will see in later pictures. 


8) Flip the paper over.
9) Repeat steps 1-7. Your new score lines will meet your old score lines in the middle of the sheet.

This is what your paper should look like at this point:


10) Use the corner rounder on the corners of the wider sections. 
11) To make the box flaps, line each score mark up with the "tail" and score across the flap; as in the second picture.


12) Use your scissors to cut on the score marks on the wider sides. Only cut up to the score line in the middle that runs perpendicular to it. 


13) On the sides with the narrower section, trim off a large part of the section. Make sure to leave enough room on either side of the score line to make a flap. (This will make more sense in step 15.)

This is what your project should currently look like:


14) Fold along all of your score lines. It's really not necessary to use a bone folder; just a crisp crease with your finger will do. 
15) Apply Sticky Strip to each of the four flaps you created in step 13. This is what will hold your box together. 
16) Remove the red backing from the Sticky Strip on two flaps. Carefully line up the edges with the larger sides of the box. 

Here is a view after one side was glued together:


17) Repeat step 16 for the other two flaps with Sticky Strip on them. 


Your box is now assembled! The middle picture shows an inside view of my box. I tucked in the smaller two flaps. I decided to leave on flap standing up, and folded the front flap down and held it there with a glue dot.

You can embellish it however you choose.


Remember those triangle pieces I cut off the sides earlier? I punched two flowers with the Blossom Punch. I then stamped the "celebrate" greeting from Express Yourself in Basic Black ink on the pink side of one of those triangles. I punched it out with the Hexagon Punch. I layered everything together with some Stampin' Dimensionals to finish my box.

The box is sturdy enough that it will stand upright on its own, even with a package of microwave popcorn in it!

I hope you enjoyed my tutorial. I'd love to see how you use it to create your own treat boxes. If you would like to see a video tutorial, and how it can be turned into a bag, click here. This is where I got my inspiration for the the project.

Stop in tomorrow to see our designers' favorites on Favorites Friday!

~Darcy Johnson of Dj's Stampin' Place

Thanks for stopping by today for your daily SSInkspiration! Don't forget to check out our Facebook and Pinterest pages for even MORE Inkspiration!

Tuesday, December 10, 2013

Envelope Punch Board Money Holder

We're already on the 10th of December...can you believe it?! As always, this month seems to be flying by! How are you doing with your Christmas gift list?

I don't know about you, but there are oftentimes I simply run out of gift ideas of what to get others or I have those "hard to shop for" people on my list. Sometimes it just works out to give them some cold hard cash so they can go shopping for themselves! ;) I've seen these money holders floating all around blog land recently and with Stampin' Up!'s new Envelope Punch Board, it has taken them up a just a "notch". My inspiration for this post came from Stampin' with Jackie & Stamp with Amy K.

{Item #133774, $19.95}

Start with a piece of cardstock cut 8-1/4" x 7".
Score (on the longer side) at 3" & 6".

 On the Envelope Punch Board, line up your score lines horizontally.
Line up the left side of your paper at 3-1/2" and punch.

Slide your paper over to the edge of the punch and punch again!

Using your Paper Trimmer, trim off the edge of the file tab that does NOT have the notch on the end.

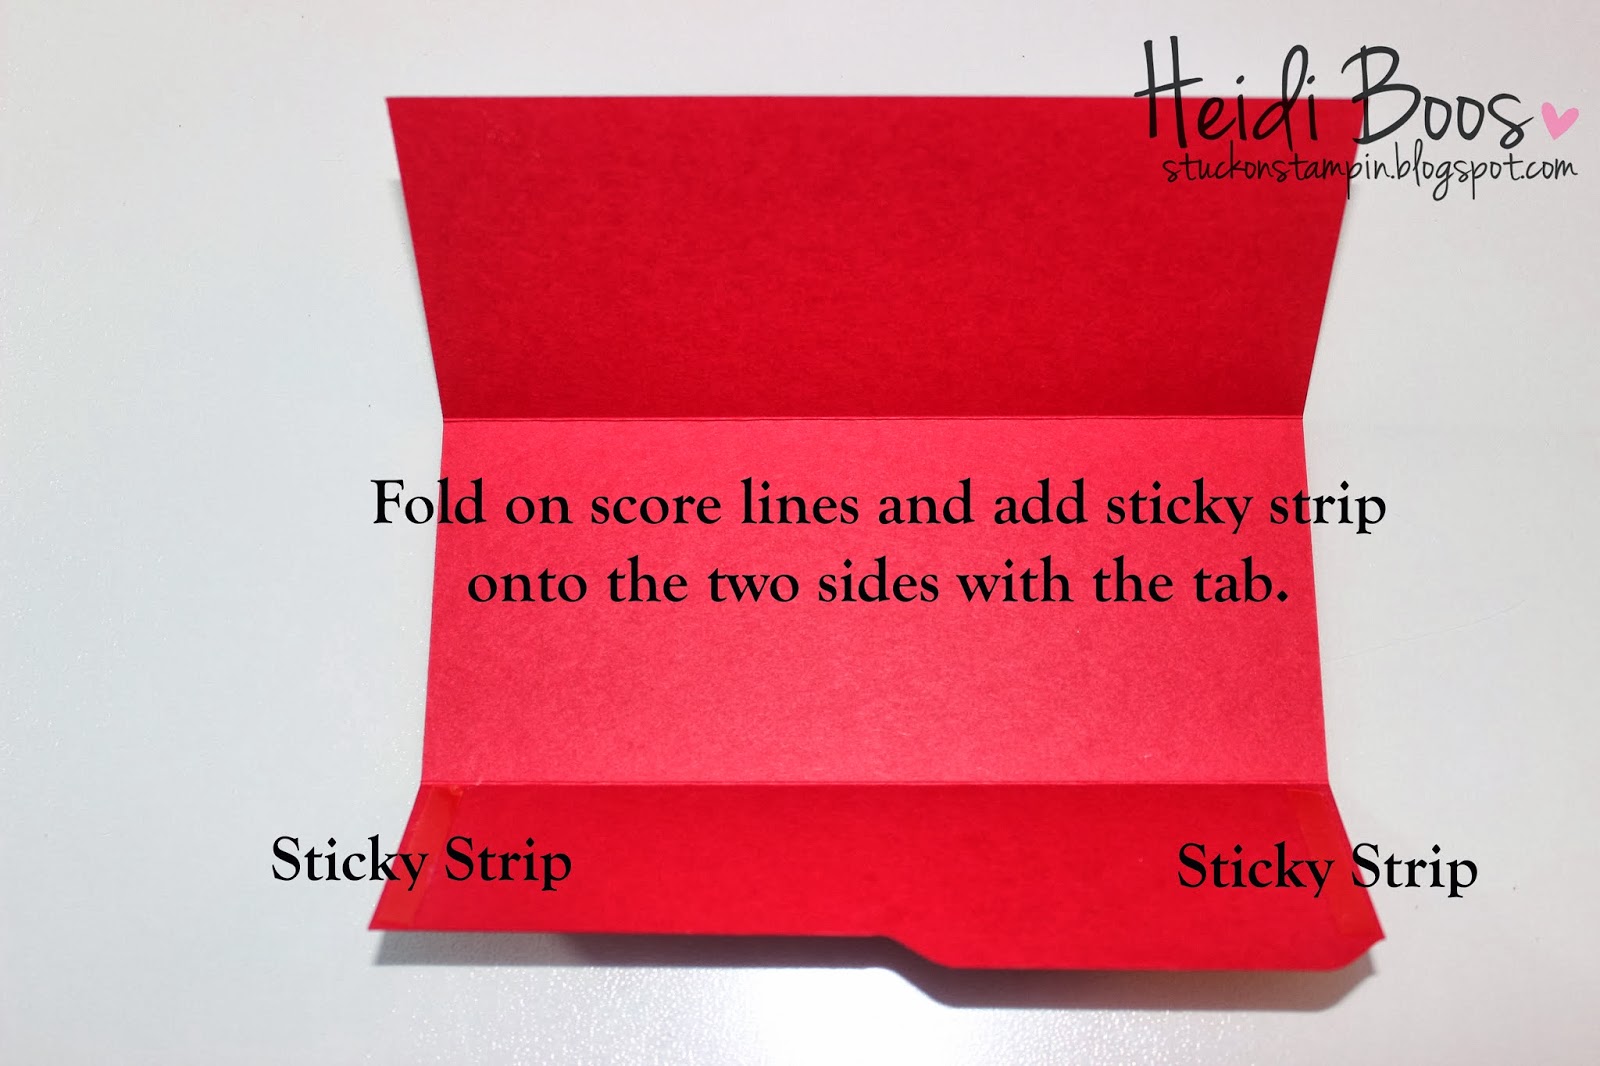
Fold on the score lines and then add Sticky Strip to each side of where the section where the tab is. Fold up to make a pocket.

Embellish to your heart's desire! 
The background paper is cut 6-3/4" x 2-3/4". I used Polka Dot Parade DSP in Real Red. The Santa stamp comes from the Tag It stamp set (clear) and I die cut it out using the coordinating Chalk Talk Framelit Dies. I then added an Old Olive banner with a couple of Real Red Candy Dots for a finishing touch. You may not be able to see it very clearly in the picture, but I did add Dazzling Diamonds to the trim of Santa's hat, gloves, and suit.

I decided to keep with the simple design I used on the front of the money holder and added a strip of the same DSP on the inside (1" x 7"). For a trimmed edge, I used the Scallop Dotted Ribbon Border Punch. And to finish it off, I stamped a quick "for you" (Chalk Talk stamp set) and punched it out with the 1-3/8" circle punch, popping it up with a Dimensional. Doesn't that little file folder tab just add a little something extra?

I thought it would be fun to slip it into a vellum pocket, so I cut a piece of vellum measuring 7-3/4" x 6-3/4". I scored at 3-3/8", folded in half and added Sticky Strip to both sides.

I covered up the sides with the Sticky Strip with a 3-3/8" x 3/8" strip of the same polka dot DSP.

Makes a fun little pocket! It would even be cute if you die cute the name of your recipient on the front of the vellum envelope. 

Thanks for stopping by today! I hope that you'll take a moment to look around our blog. There are lots of great ideas to be shared!! And, don't forget to link up for this month's Card Sketch!

Thanks for stopping by today for your daily SSInkspiration! Don't forget to check out our Facebook and Pinterest pages for even MORE Inkspiration!