Showing posts with label My Paper Pumpkin. Show all posts

Thursday, September 24, 2015

Paper Pumpkin

Have you seen the Paper Pumpkin Kit for September 2015?!  If you didn't get your hands on it, you will be sorry.  It's SO CUTE!!


Watch this video and then sign up with your demonstrator so that you  never miss another month!


One of the great things about Paper Pumpkin is that when you are done with the projects, you will have the stamp sets to use FOREVER!  There are always bits and pieces of kits left over and you can see how a few of our Design Team Members used those pieces to create other cards!


Laura - Crafty Chicks Creating


Leanne Johnson - Literally My Joy

Thanks for stopping by today for your daily SSInkspiration! Don't forget to check out our Facebook and Pinterest pages for even MORE Inkspiration!

Thursday, April 23, 2015

Paper Pumpkin

We LOVE Paper Pumpkin kits over here at SSINKspiration!  If you don't currently receive the kits, you should sign up!  I know I never want to miss one of the exclusive stamp sets that can not be purchased any other way!

Today our Design Team Members used pieces from many different kits!  Take a few minutes to visit their blogs to see what kit they used and get more details on why they love Stampin' Up!'s Paper Pumpkin monthly subscription!


Carrie Rhoades - Carrie Stamps


Jennifer Gregorsky - Jenny G Paper Crafts


Cynthia Richards ~ Ink a Doodle Creations


Laura - Craftychickscreating


Kim Ryden ~ Stamping with Kim


Thanks for stopping by!  We will see you back here tomorrow for another INKspiring post!

Thanks for stopping by today for your daily SSInkspiration! Don't forget to check out our Facebook and Pinterest pages for even MORE Inkspiration!

Thursday, April 2, 2015

Happy Mother's Day

Happy Thursday!  This post is just a warning that you have a little over a month to get ready for Mother's Day!  We all have at least one mother in our lives.  It doesn't have to be your mother!  You can send cards to a friend that is a mother, a woman who is like a mother to you, your daughter that is now a mother and so many other women in your life!

Here are a few Mother's Day ideas from the Design Team...

Jennifer Gregorsky - Jenny G Paper Crafts


Pamela Wu - Stinky Tofu


Breelin Renwick ~ Craft-somnia Momma


Kim Ryden ~ Stamping with Kim


Thanks for stopping by today!  We will see you back here tomorrow for another INKspiring day!


Thanks for stopping by today for your daily SSInkspiration! Don't forget to check out our Facebook and Pinterest pages for even MORE Inkspiration!

Tuesday, February 24, 2015

My Paper Pumpkin

Hello Happy Stampers!!
Do you Paper Pumpkin?

I sure hope so.  
What could be more awesome than EVERYTHING you need to complete a small project, home decor, or set of cards...oh...and it is delivered to your door once a month?!  
um...YES PLEASE!!

Think your Paper Pumpkin subscription is awesome as is?  Just wait till you see what else you can do with your Paper Pumpkin subscription!
Not a subscriber?  You will so be interested after seeing these!!
Be sure to check out our Designers' blogs so you can see which kit they used..what it was originally used for..and what they ended up making with it!!
Thanks for stopping by!  Can't wait to see what you do with YOUR Paper Pumpkin.


Thanks for stopping by today for your daily SSInkspiration! Don't forget to check out our Facebook and Pinterest pages for even MORE Inkspiration!

Thursday, February 19, 2015

Quick & Easy Cards

Today the team is sharing some Quick & Easy Cards with you. Now let's see a show of hands, who is ever busy with family, job, or just life in general? You want to stamp and share a card with others and just don't have the time to make an elaborate card. 

If this describes you then our quick & easy cards are just what you need. I know I have felt that way and stamping should never be stressful. Don't forget to pin the cards so you have them to reference in the future. 

 Heidi Boos ~ Stuck on Stampin'


Jennifer Campbell- Happy 2 Scrap


Eva Bussom  - Eva's cards and things 


Darla Roberts - Stampin w Darla and Sisters


Kim Ryden ~ Stamping with Kim


Thanks for stopping by today!  We will see you back here tomorrow with more INKspiration!

Thanks for stopping by today for your daily SSInkspiration! Don't forget to check out our Facebook and Pinterest pages for even MORE Inkspiration!

Tuesday, December 16, 2014

Stampin' with Cynthia!

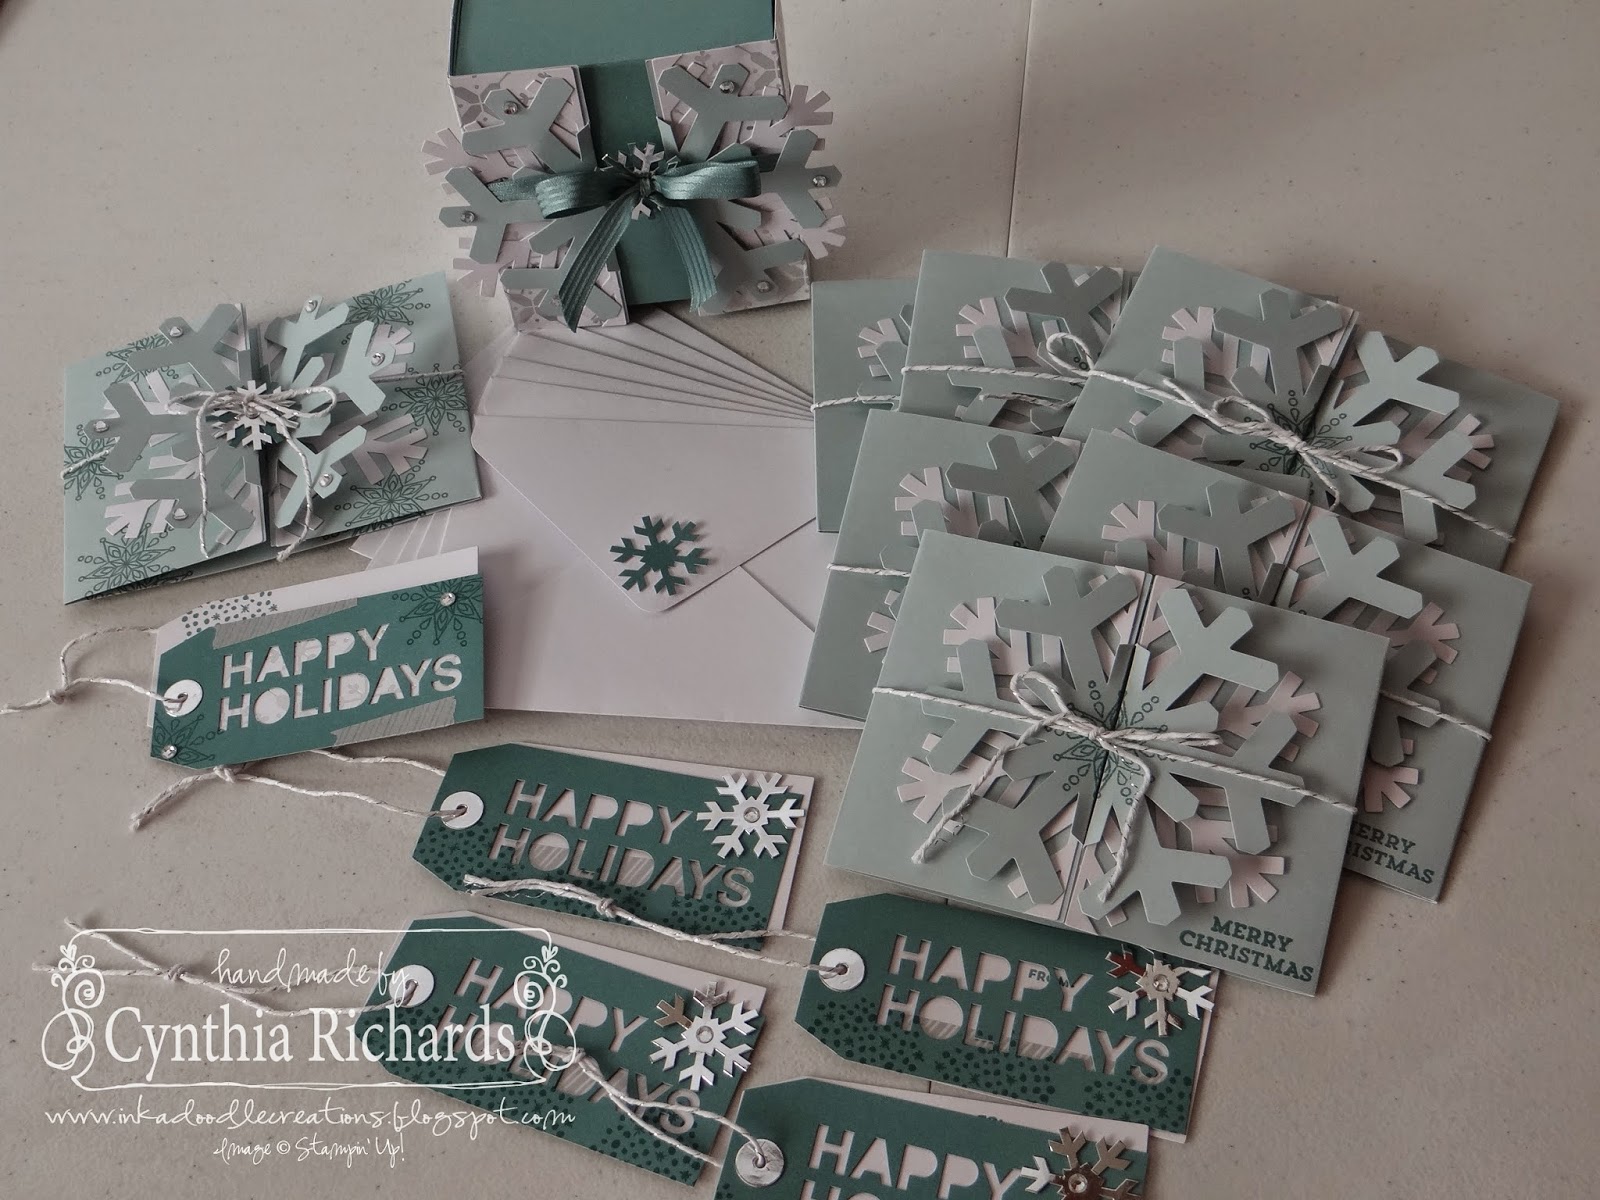
Good morning, Cynthia here with Ink a Doodle Creations.  Today for my individual post project share, I wanted to create and share the items that I made with the November My Paper Pumpkin kit.  I needed some quick and easy Christmas cards to give to each of my neighbors with their cookie treats.  I love how Paper Pumpkin is always there for me when I need these simple and quick projects.  I also love it when all of this....


....can turn into all this and much more!


I needed to create some quick and easy Christmas cards to hand out to my neighbors. I used all the supplies included in the kit to create the projects just like they are shown in the instruction papers included in the kit.  BUT, yes like everyone else, I enjoy editing it a little to make it my own as well as using the left over parts (cause Stampin' Up! does a wonderful job at giving you plenty and lots of extras) to create something new.  (stay tuned for next weeks scrapbook page!!)


So for the most part, my card is created the same as the others.  I just stamped with the snowflakes, added some rhinestones to the tips of the large snowflake and added the die cut lost lagoon and silver foiled snowflakes to the center.


I also created a different stamped tag.  I added a piece of DSP behind the "happy holidays" cause it matches.....


...this cute little box wrap.  This is the project that I will be sharing the instructions for, so that you can recreate it on your own.  I created box #12 (as I have numbered them from the 1st size down to the last size, to know which one I need for future use) for the wrap to go around.  It was the closest box in size that can be made with the Box Punch Board.  The box slides easily in and out without having to untie the bow and messing it all up!!!


To cover up the added score lines, I covered it with a piece of DSP from the All Is Calm pack.  I also used about a 24" piece of lost lagoon satin ribbon to wrap around instead of the twine, as I wanted it to be a little more sturdy.


If you look closely, I used the beginning score lines of the card to start getting the score lines I needed to wrap the box.  I didn't want to make anymore new lines than was needed.  The two together help show where I began.  You will use the two provided score lines on the card to work off of to get your others.


So if you start from the first score line (the one that is already on the card) you measure in towards the center 3/4".  Do this on the other side as well.  Adding these two score lines gives you the bottom section for the box to sit on as in the picture below.  The box fits perfect now in between.


Now start from that newly created scoreline and measure back 1-15/16" towards the snowflake end on each side.  Doing this give you the lines you need to have it wrap over the sides of the box and top as shown in the next picture. 


Remember, you will not use the starting score line that comes on the card already.  It will get covered by the DSP and you won't be able to see them from the outside.

I hope you have enjoyed my snowflake projects.  Leave some "love" and if you have any questions, leave a comment and ask away.  I'll be glad to help you recreate it for yourself!

Supplies Used
November My Paper Pumpkin Kit
lost lagoon satin ribbon, box punch board, all is calm DSP pack

Thanks for stopping by today for your daily SSInkspiration! Don't forget to check out our Facebook and Pinterest pages for even MORE Inkspiration!

Wednesday, September 17, 2014

Scrapbooking w/ Kim

Hi Everyone!  It's Kim here!  I have been a traditional scrapbooker for 12 years now!  I feel like a lot of the crafting industry is going away from the traditional scrapbooking and moving to digital or Quick & Easy like Project Life by Stampin' Up!  But I have 40 full albums and I'm still going strong!

Now, don't get me wrong, I LOVE My Digital Studio and I ABSOLUTELY LOVE Project Life by Stampin' Up!  And I use both.  BUT...NOTHING beats a traditional scrapbook layout!

Today I'm going to show you 3 of the latest layouts that I created for my Scrapbook Club ladies.  Each month they come to my house and get to create a fun layout!  I love to show them how easy it is to use Stampin' Up! products to scrapbook!

July Club Layout
I loved using the June My Paper Pumpkin kit on this layout!  The Pinwheel is just SO CUTE as an embellishment!!

Supplies Used
DSP: Maritime
Stamp Set: Be The Star
Big Shot: Stars Collection Framelits


 August Club Layout
This month I showed my club how easy it is to use Embossing Folders on your scrapbook layouts!

Supplies Used
DSP: Typeset Specialty
Stamp Set: Day to Day, Skinny Mini, Remembering Your Birthday
Big Shot: Word Bubbles Framelits, Large Dot Embossing Folder, Alphabet Press Embossing Folder, Arrows Embossing Folder


September Club Layout
I showed the ladies in my club how easy it is to use the Decorative Masks while scrapbookng!  SO CUTE and SO EASY!

Supplies Used
DSP: Flashback
Stamp Set: Snapshot Single Stamp
Big Shot: Circles Framelits
Punches: 1-3/8" Circle, 1-1/4" Circle


Thanks for stopping by today!  I hope that you were INKspired to scrapbook a little today!  We will see you back here today with another Stamp Set Focus post!

Thanks for stopping by today for your daily SSInkspiration! Don't forget to check out our Facebook and Pinterest pages for even MORE Inkspiration!

Tuesday, August 26, 2014

My Paper Pumpkin w/ Kim

Hey Everyone...Kim here!  The My Paper Pumpkin Kit this month was SO CUTE!  I wanted to show you all what you are missing if you do not get this monthly!

This month we received a card kit with supplies enough to make 4 regular size cards with envelopes and 4 smaller size cards with envelopes.  Once you used all of the card bases provided, there was plenty of other supplies left over to use a little of your own cardstock and create MORE!

So here is what one of the cards looks like straight from the sample Stampin' Up! created...


Don't you just LOVE the negative image word cut out?!?!  And PINK sequins!!

Everything you see on this card came directly from the kit!  (Except that I will say I used the Dotty Angles Stamp Set to stamp the dots on the top of the card all at once instead of individually with the single dot stamp we received in the kit.  I used that single dot at the bottom where the dots are more spread out!)


And here is a card that I made using some of the kit contents and some of my own... 


I decided to go Black and White with a pop of PINK on this card.  I used a Basic Black cardstock base, a little bit of Back to Black DSP and some Smokey Slate ink!  The pop of pink comes from those super cute sequins that were in the kit!

Remember...


You MUST sign up by September 10th in order to get HALF OFF your first 2 My Paper Pumpkin Kits!  This is such a great deal!  Don't miss out on it!

All of our Design Team Members are Stampin' Up! Demonstrators so if you don't currently have a Demonstrator, we would love for you to sign up with one of us!  Let us know if you have any questions.  Head here to sign up NOW!


Thanks for stopping by today for your daily SSInkspiration! Don't forget to check out our Facebook and Pinterest pages for even MORE Inkspiration!

Tuesday, July 1, 2014

Pinwheels!

Hello Stampers!  Welcome to another edition of Technique Tuesday!!  
I'm Donna from Organized Chaos here to show you a thing or two about PINWHEELS!!
(can you just stand the excitement!!)

For those of you who got your June MyPaperPumpkin kit..you KNOW what I'm so excited about!!

I remember making these as a kid; oodles and oodles of these to the point where my mom had to make me put down the scissors and straws and GO OUTSIDE!!  (I also have a paper snowflake addiction, but that's an entirely different post!!)

Pinwheels are super easy to create!  All you need is a square piece of paper, some scissors, glue/adhesive, and something to poke a hole.

You can make pinwheels in all shapes and sizes.  The assembly is always the same.
Start with a square piece of paper (for this demonstration it is a 2in by 2in piece of cardstock)

  Cut diagonally towards the center in this manner.   The parts with the dots you are going to want to curl with your bone folder.  This makes the process MUCH easier with the smaller pieces of paper!
**Note, the big dot in the center is your glue spot!  Aim for all of your tiny dots to meet at the large dot.
Then you'll end up with something like this:
if you're dexterity is amazing, you can secure with a brad...mine is NOT so I cheated and glued them down with adhesive first, poked a hole in the center and added the brad.  I'm kind of short-cut like that.

After some fancy dancy embellishing....you end up with this!

I LOVE adding a few pinwheels to cards.  Adds that whimsical feel and they're relatively easy to make if you just have a little patience and a lot of scraps on hand!  (and who knew toothpicks could be so handy?!)

If you're curious about the June MyPaperPumpkin kit and want to see a super quick video, check this out!


Then check out the amazing design team's take on their pinwheel projects!
Enjoy!

Cynthia Richards ~ Ink a Doodle Creations


Kim Ryden ~ Stamping with Kim


Thanks for stopping by today for your daily SSInkspiration! Don't forget to check out our Facebook and Pinterest pages for even MORE Inkspiration!

Wednesday, June 11, 2014

You Da Man!

It's Kim here!  Crafting for the men in our lives is sometimes hard to do.  So today I will be showing you a two projects with a few of the new Masculine products that Stampin' Up! just released in the NEW catalog! 


My first project is this birthday card that could easily be turned into a Father's Day card with a sentiment change.  I am loving these new products:

Mustache Framelit Die

Typeset DSP

Well Worded Stamp Set


(Pictures by Jessica Strom)
My second project for you today is a cute layout about my little man!  I used all of my favorites from the card above but I added in a few others...

Dots & Stripes Masks

I used the masks with a sponge and a little Crumb Cake ink.  I love the look that it gives plain old cardstock!


Epic Alphabet

I just LOVE this alphabet!  I think that it works well for masculine or feminine projects.


#Hello Stamp Set

@SoSocial Stamp Set

I love adding these hashtags to scrapbook pages!  I can't wait to get back in the craft room to make some cards with these sets!


Thanks for stopping by today!  I hope that these new samples have inspired you to create something for the man in your life today!  You know he'll love it!

Thanks for stopping by today for your daily SSInkspiration! Don't forget to check out our Facebook and Pinterest pages for even MORE Inkspiration!